Starting the Editing Process
To edit a Track you've already made,
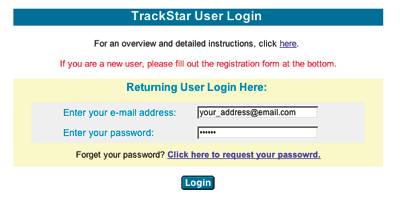
click on Login to Make or Edit a Track on the TrackStar home page. This
will take you to the login page. Enter your e-mail address and password, and click
on Login. You can see the form below.
This will take you to the My
Account page, as shown in the image below. The My Account
page lists all the Tracks you have made.
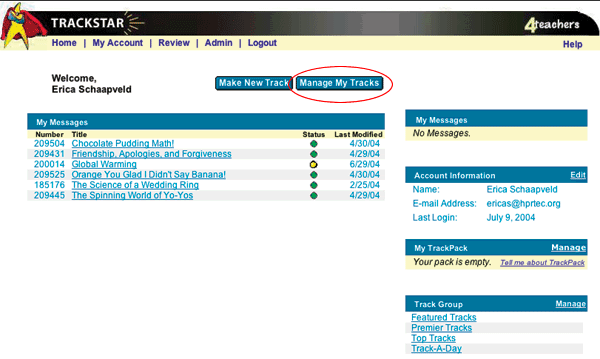
Click on the Manage My Tracks
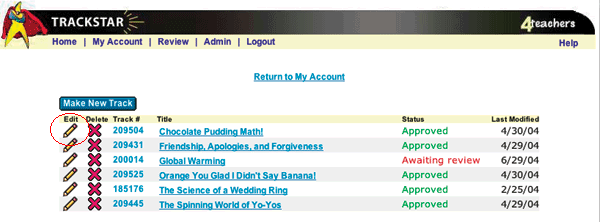
button, when you want to edit an existing Track in your account. As shown in
the image below, each Track has an Edit button in the form
of a Pencil icon. Click on the Pencil to Edit
the Track of your choice.
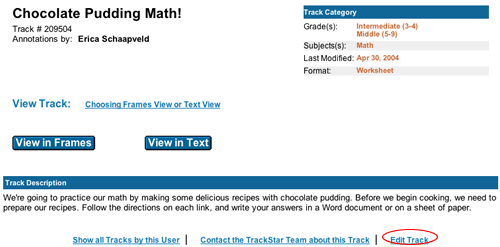
You can also edit a Track directly
from the Track itself (rather than from your account home page). The front page
of your Track contains an Edit Track link in the lower right-hand corner
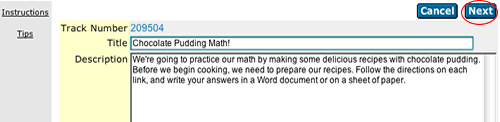
of the window. Please see the image below, which shows the front page of Track
209504, a Track on math.
When you click Edit
Track on your Track's front page, you will need to enter your login information
and then you will be taken to the Editing Your Track form, whose layout
is identical to the Make a Track page. The top of the page looks like
this. Notice that the title of your Track and all of the other information is
already completed in the form.
In the Editing Your Track
form, make any changes you want to the Track information and description. To
edit your link titles, URLs, and annotations, click the Next
button as shown in the image above, and this will take you to your Track Update
page. Should you need to return to this page at any time after you clicked Next,
please use the blue Back button provided by TrackStar and not
your browser back button.
Editing
Links and Annotations
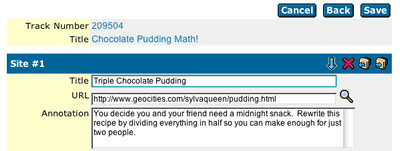
The Track Update page allows
you to instantly see all the links in your Track, and provides a real-time
preview of the pages and annotations in the form, so it requires a browser
that is Javascript enabled (such as Netscape Navigator 2.0 and up, and Internet
Explorer 3.0 and up).
An Explanation of the Form
When you are on your Track
Update page, you'll see a form like the one below.
You can use the tools on this page
to perform many different editing functions to your Track. Each site you list
will have these tools available for your use. The up
arrow will move the current site you are working on up one level. For example,
if you want to move your Site #2 to the Site #1 position then you can click
this arrow and it will move Site #2 up one level to replace Site #1. Site
#1 then is renamed Site #2. The up
arrow will move the current site you are working on up one level. For example,
if you want to move your Site #2 to the Site #1 position then you can click
this arrow and it will move Site #2 up one level to replace Site #1. Site
#1 then is renamed Site #2. The down arrow is just the opposite of the up arrow. It moves the current site
down one level. The
down arrow is just the opposite of the up arrow. It moves the current site
down one level. The  red x will delete the current site. For instance if you click on the delete
icon while you are on Site #2, then just Site #2 will be permanently deleted.
The
red x will delete the current site. For instance if you click on the delete
icon while you are on Site #2, then just Site #2 will be permanently deleted.
The  TrackPack Out will add a link in that you have previously stored in your TrackPack.The
 TrackPack In will add the current link you are working on to your TrackPack
as well as in the Track you are working on. To learn more about TrackPack
and its uses, please visit the TrackPack help
pages. The
TrackPack In will add the current link you are working on to your TrackPack
as well as in the Track you are working on. To learn more about TrackPack
and its uses, please visit the TrackPack help
pages. The  magnifying glass will allow you to see a preview of the site you are linking
to in a new window, which lets you check to make sure that all your links
are working properly.
magnifying glass will allow you to see a preview of the site you are linking
to in a new window, which lets you check to make sure that all your links
are working properly.
Note: If you choose to remove links by clicking the Delete button, you will
notice that a blank space is left in your Track. Once you are done editing
the Track and click Save, the system will know to automatically erase those
blanks in your Track.
You may also choose
to just click in the text fields located under each site you originally added
in order to edit the Title, URL, or Annotations for each site. Just click
in the text fields and type like you normally would if you were using a word
processor.
This form
also accepts HTML code. For example, an annotation entered into
the box as this:
<ul>
<li>red</li>
<li>blue</li>
<li>purple</li>
</ul>
will show
up in your Track as this:
When you are completely
finished editing the links in a Track, please click the Save button
either at the top or bottom of the page. By clicking Save, you
save changes to the TrackStar server.
| 
