Important
Precautions for your Track
-
Because
TrackStar is an online tool, server functions, electrical problems,
or occasionally user action may interrupt the submission of
a Track. For this reason, we strongly
advise Track authors to store a draft of their Track's links
and annotations in a word processor file on their own computer.
This prevents authors from having to recreate Track content
from scratch in the rare case that a Track must be re-submitted.
We know that good lessons take time to create, and we want to
help you preserve your hard work.
-
-
Naming a Track and Choosing a Subject Area
-
-
-
In order
to conserve server space, we like to delete demo or practice Tracks.
If you create a Track just to learn how TrackStar works, or if you
don't want your Track to remain online after one week, please name
it "demo" so that we can remove it from the server. See
the example below.
-
Naming
a Track You Want to Keep
-
-
-
Please enter
a descriptive title for your Track. The TrackStar search engine will
search titles for keywords, so please be as specific as possible when
naming Tracks. For example, a Track titled "Pre-Columbian Architecture
in Peru: Macchu Picchu" would be a much better title than "Architecture".
-
Adding
a Description and Choosing a Format
-
Please include
a brief description of your Track in this field. Describe the content,
goals, objectives, and activities in your Track. Tell whether the
Track is part of a greater project or a self-contained lesson, and
what state standards the Track meets, if any. The most valuable and
utilized Tracks are those that present material as an organized lesson
rather than simply as a list of resources on a topic.
-
-
-
It's best
if you write this and spell check it in a word processor, and then
cut and paste it into this field. Teachers often decide to enter a
Track by reading the description and title. Since teachers around
the world use each other's Tracks, providing a good description can
help people see quickly what a Track is about.
-
-
Using
Keywords in Your Description
-
-
-
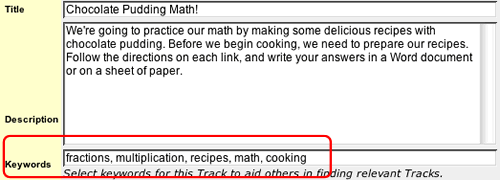
The TrackStar
search engine will search Track descriptions for keywords. To speed
the search, include keywords in the Keyword field
provided on the TrackStar form. See keywords in the example below.

-
Choosing
a Format for the Track
-
-
-
This
section of the Make a Track form is crucial
to other teachers who may use your Track. If you are making
a Track simply to learn how to use TrackStar, or if you don't
want to keep this Track online more than one week, please
click the radio button next to Demo. Click Resource
list if the Track provides a list of sites to support
research projects, thematic units, skills in practice, or
information gathering. Click Worksheet if the Track
requires students to find short factual answers in the Track's
resources. If the Track supports higher order thinking skills,
click Extended Learning. For an example of higher level
questions, visit our Extended Learning
page.

-
Choosing
a Subject Area and Grade Level
-
-
-
Select the
subject area(s) and intended grade level that best reflect
the content of your Track. Since people often search for Tracks using
the subject and grade level categories, please choose the most fitting
category. If needed, you can select more than one.
-
Adding
Sites to Your Track
-
See the
example below for an example of the fields in the TrackStar form.
A Track is a collection of annotated links on a chosen topic. Each
link in your collection needs a title, a URL (Web address), and an
annotation (questions, directions, and tasks for students to complete
while visiting that link), as shown in the image below.

Complete the title, URL, and annotation
information for your sites and then scroll to the bottom of the page and click
Save. By clicking on the Save button, you submit any additions
or changes you have made. These changes are stored on the TrackStar server.
If you do not click on the Save button, your new Track will not be
made, or changes to an old Track will not be saved.
-
Using
HTML Tags in Your Title and Annotations
To make longer annotations,
you may want to use HTML tags to format line breaks and create lists.
Using HTML tags is a way to get your formatting to show on the Web.
To make annotation text appear as separate paragraphs, place a <br>
(break tag) or a <p> (paragraph tag) after each paragraph.
The <p> leaves a larger space between paragraphs. To make
several questions look more like a list, place <br> after
each question. These are only two examples of using HTML tags within
annotations. See the example below for an annotation that uses a <br>
(break) tag:

The above annotations would
show up in your Track (without the tags) as seen below. Note how the
sentences are on their own lines now.

We encourage
TrackStar users to use HTML that assists students in reading annotations,
such as the <br> tags above, but you can also
use other HTML codes such as list tags like <ol>,
<ul>, and <li>, or other
common formatting tags. Font formatting tags such as <b>
</b> for bold, <u> </u> for
underline, and <i> </i> for italics are
also acceptable. We do not allow users to include images, sounds, or
video HTML links in Track annotations, as their inclusion considerably
slows the loading-time of Tracks. Additionally, please refrain from
using HTML in TrackStar that changes the overall look of the Track format.
|
|
|
|

