|
If you
are a new user,
click on the Create an Account and Start Making Tracks
on the TrackStar home page. The area of the screen looks like
this:
You
will be directed to the TrackStar Login page. As a new user,
you should fill in the lower form with your name, e-mail
address, postal code, country, and password (with confirmation).
When you have completed the form, click the Register
button under the form, as shown in the image above.
This will take you to a confirmation page. On this page,
click on Login to Make a Track. As shown in the image
below, you will need to enter the email address and password
you just used to register with, and then click the Login
button.
This
will take you to the My Account page, as
shown below, where you can click on the Make a New
Track button to start creating a Track.
Logging in as a Returning User
If you are a
returning user then you just need to login to your account. To do this,
click on the the Make or Edit a Track link on the TrackStar home
page. As a returning author, you should fill in the top form by entering
your email and password and then click on Login, shown
below. This will take you to the My Account page.

The My Account Page
The My Account
page, as shown below, offers the user many functions for maintaining and creating
Tracks.
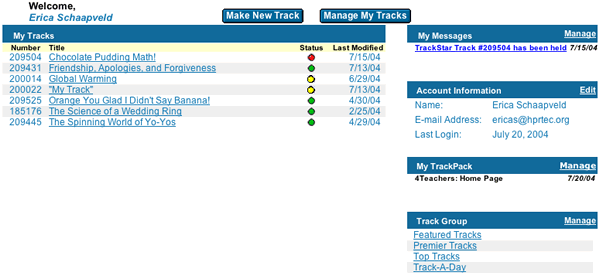
This page lists the user's Track,
Messages, Account Information, TrackPack, and Track Group. It also has buttons
that allow the user to make a new Track and manage existing Tracks.
My Tracks
Under this section, you can find
a list of all your Tracks. For example, in the image below you can see that
this user has seven Tracks in her account.

Notice that
each Track has an id number, title, status, and last date modified listed.
You will want to pay close attention to the id number assigned to each
of your Tracks. This number is the easiest way for your students to
access the Track. To preview the Track you may click on the title of
the Track. The status of your Track will be represented by a green,
yellow, or red diamond. Green means that your Track has gone through
the TrackStar review process and everything in your Track fits the TrackStar
guidelines. Red means that your Track is not yet reviewed, but still
able to be used. Yellow means that your Track is on hold, and you should
refer to your messages in order to see what needs to be corrected. The
last date modified shows the last time you or the TrackStar administrators
edited the Track.
My
Messages
In the My Messages center, you
will receive alerts from the TrackStar Administrator. If one of your Tracks
should be placed on hold, a message is automatically sent to your TrackStar
account and to the email address you used when you registered with TrackStar.
When you login you will then see the alert message, like the one in the
image below.

To read the message, simply
click on the title of the email. A new window will open and the email message
will tell you exactly why the Track was placed on hold and what steps you
may take to correct the error. The image below shows an example of an alert
email.
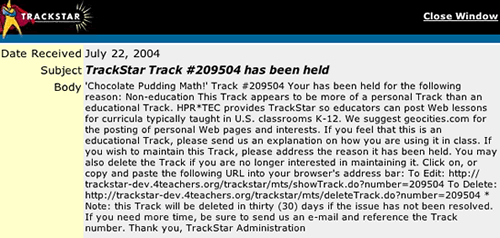
Once you have
read the email and made the corrections, you can click on the Manage
link, located in the upper right-hand corner of the message center. The
manage page of the message center looks like the image below.

To view the alert message you
can again just click on the subject of the message and a new window will
open with the alert. Once you have corrected the Track, click the Contact
TrackStar Administrator link in order to notify the TrackStar Administrator
so that the hold can be released. Afterwards, click the Delete This
Message to erase the alert from your message center.
Account
Information
Your account information is
also listed on the My Account page, as shown below.

If you need
to update your information, click the Edit link. As shown
in the image below, you may update your name, email address, postal code,
Country, and password. Once you have made the corrections, click the Update
button.
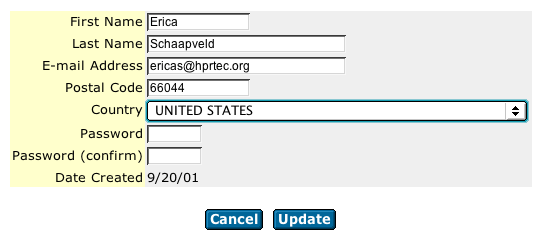
My
TrackPack
For more advanced TrackStar users,
we offer a way to collect Web sites and annotations while you are out surfing
the Internet. For more information on how to use TrackPack, please vist
the TrackPack page.
Track
Groups
TrackStar is a database of thousands
of Tracks made by educators. You can use our search functions on the home
page of TrackStar to find Tracks that fit your needs. Once you find these
Tracks you can then group them together in collections in your own account.
On the My Account page you can see an example list of this
user's Track Groups.
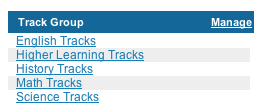
To start making your Track Groups,
click on the Manage button, as shown in the image above.
Click on Make New Track Collection. Enter the name of your
collection. Then enter a code, which is an abbreviated or one word version
of the name you just entered. You will need this code when you start adding
Tracks to your collection. Enter a password and description. An example
of a completed form is shown below.
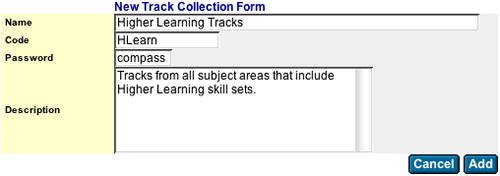
Click Add once
you are finished. You will then receive confirmation that the collection
has been added to your Track Groups. Click Manage Collections.
This will take you to the Manage page as shown below.
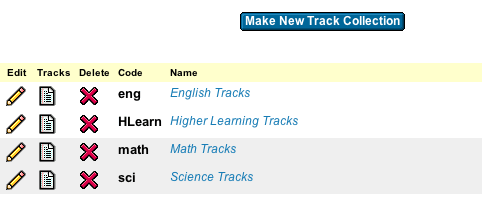
On this page you
can edit the collection information by clicking on the pencil icon. You
can add Tracks to the collections by clicking on the paper icon. Delete
the entire collection by clicking on the red "x" icon. This page
also lists the code and name for each collection.
To add Tracks to
your collection, you must first click on the paper icon. Then you will be
taken to a page like in the image below.

Enter the Track
id number of the Track you would like to add to this collection, and then
click Add. You will then receive a confirmation page. Click
on Manage Collection Tracks to return
to your Tracks listed in that collection, as shown in the image below. Notice
that each Track in the Manage Collection Tracks page has
a delete button to remove it from the collection. It also lists the Track
id number, title and author, and on what date you added it to your collection.
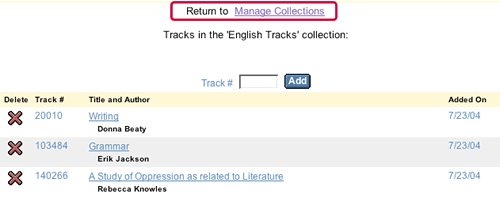
Click Return to Manage Collections,
circled in red in the image above, to add more collections and Tracks.
Make a Track
On the My Account
page you can click the Make New Track button to start creating
a Track. For help with the Track creation process, please visit our Making
a Track page.
Manage
Tracks
To manage or edit your Tracks, click
on the Manage Tracks button. If you would like step-by-step
instructions on how to manage your Tracks, please visit our Editing
a Track page.
|

